Tuesday 26 April 2022

Construction blitz…

I’ve always enjoyed assembling kits – before puzzles it was model aircraft and hairy-choppers – those were truly the gift that kept on giving with the need to rebuild and repair when ambition exceeded altitude and airspeed… but having left that hobby behind for a far cheaper one (let’s see if I get away with leaving that one out there) in the form of puzzles, I don’t get my assembly-fix quite as often… I’ve blogged about my Karakuri kits before but recently I’ve ordered a few of the NKD kits and they’ve supplied several weeks of my assembly-fix.

A while back I assembled the Silver City Luxe kit and found the process of gluing the little bits of veneer on at the end really tedious – in the end my copy of the puzzle looked presentable – but definitely not up to close scrutiny – it was obvious that it had been built by someone with more enthusiasm than skillz…

In spite of that I ordered a copy of the Luxe version of the Scriptum Cube and Mecanigma as well… and over the past couple of months I’ve been working my way through assembling those.

The carcasses go together really well – the laser-cutting is all spot-on and very few of the pieces were so tight they needed a bit of fettling. The innards of the Scriptum Cube go together quite quickly and as long as you follow the instructions carefully you should get everything right first time… I ended up with just one bit that (still) doesn’t quite work properly – but as it’s an internal bit that’s only really there to hide some of the guts, I’m not losing much sleep over it… and some point I’ll work out why it doesn’t fit where it should…

Once the carcass is built, you have the joys of the veneer to apply… but this time the good folks at NKD have switched from PVA wood glue to gel superglue – which gives you about 10 seconds to get things properly positioned and apply some pressure to secure it in place and literally 20 seconds later you’re onto the next piece safe in the knowledge that piece isn’t going anywhere fast…. Sure you need to be careful about where the gel goes, but if you’re careful you don’t HAVE to glue yourself to your project – that bit’s optional.

The veneer on this one ended up taking me a bit longer than the rest of the assembly, and once again my copy’s not going to win any beauty contests, but it’s perfectly functional and looks good enough at a distance!

Oh yeah, and it’s a cute puzzle too – obviously if you’ve built the thing, you know exactly how it all works, but I suspect it’ll amuse a few puzzlers when they eventually start dribbling back to Barnt Green at some point in the future.

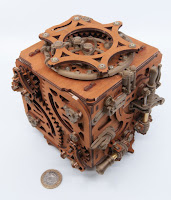
Mecanigma is an interesting combination of some very cleverly-engineered laser-cut ply and lots of 3D printed pieces. You start out by applying several thin coats of wood stain to the ply sheets before starting with creating a huge number of sub-assemblies and the main carcass. Once you’ve used up most of the wooden bits you being to combine the 3D-printed bits and the sub-assemblies into some wonderfully interesting mechanisms…

You work your way around each of the faces in turn, pausing to make sure that all of the mechanical bits are working properly and interact reliably with those on the previous sides before moving onto the next side… (Word to the wise: take your time on this bit and make sure the mechanisms are all silky smooth – it’s a LOT easier to do that now than to try and do it when there’s a lot more hanging going off the carcass.)

Again, once you get to the end of the assembly process you’re pretty familiar with the mechanical bits of the puzzle, and you’ll have had to check the puzzle-y bits as well so it’s not going to take you long to solve it – given that all of the mechanics are out there in full view it does make for an impressive mechanical contraption – with a bit of puzzling thrown in for good measure.

If you want a pretty puzzle, give the good folks at NKD your money and get them to build it for you – they’re going to do a better job than most puzzlers I know… but if you need the occasional assembly-fix like I do, then they provide plenty of building pleasure with a good dose of sense of achievement - AND you end up with a puzzle box for your mates to play with.


Yes, I challenged myself to get the word carcass in there 5 times… I’m a bad person.
Tuesday 19 April 2022

Pennytentiary

Not only a great play on words, it’s also an excellent puzzle!

This compact little sequential discovery puzzle from Eric Fuller packs a shed-load of puzzling into a tiny form factor – by my reckoning, several weeks’ worth of puzzling – ‘cos that’s how long it spent on my desk staring at me while I singularly failed to solve it. Several times I showed it to my mates on our weekly Zoom calls. Mostly to confirm that I had still made absolutely no progress. They didn’t mock me, much…

Right, so what have we got here?

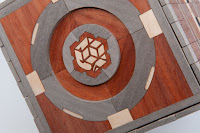
I reckon it’s about three inches square and about an inch deep… you can see the four screws that appear to be holding all those neat little layers of wood and acrylic together so I won’t describe them (oops!). There’s a keyhole shaped opening on one side and there’s what looks like a penny trapped inside… trapped by at least four sliding metal bars that gravity dictates will pretty much always block the little coin’s escape…

And this is where the fun begins… Eric knows that as soon as you see this little set up, you’re going to all do the same thing – so you might as well do it and get it over and done with, I mean, you never know – it might actually help… SPOILER ALERT – it doesn’t!

After that I tried wiggling things – anything I could find – and that got me literally nowhere as well… and that was pretty much the state of my progress for several weeks. (Yup, not the sharpest knife in the drawer!)

This past weekend I tried something I hadn’t tried before, and something happened that hadn’t happened before – and I thought to myself that that might actually be useful… and it was – not only did it give me a new sense of purpose, it also gave me something to work with…

Little did I realise that that was literally just the beginning, and this little guy held a whole lot more secrets to conquer – all the way through there were reminders that Eric was playing puppet-master – giving a little with one hand and then slapping you across the face with the other – sorry, that’s another blog altogether – but the man teases you and plays with your emotions – he makes you think you’re almost there, and then laughs in your face when you realise there’s something else to solve…

This one really does keep on challenging you and surprising you all the way through the solve – there are some “What the heck?!” moments and a few “You bastard!” moments… all crammed into three inches squared. And if you’re as bad at solving them as I am, you can look forward to several weeks of puzzling value!

If you didn’t get one from the last release, you really ought to try and grab one this time around!

Sunday 3 April 2022

Ziggurat

I thought Ziggurat looked interesting when I first spotted it in the 2021 Design Competition, so when Eitan announced on Facebook that he would be making copies available for sale, I asked for my name to be added to the list of keen puzzlers wanting to acquire a copy.

Eitan had three versions available [over here] – a two-coloured version, a multi-coloured version (you pick the colours) and a rainbow-coloured version – I rather liked the standard rainbow pattern so opted for that one and a couple of weeks later the vagaries of the post(?)-COVID international postal system delivered a carefully packaged puzzle to my doorstep.

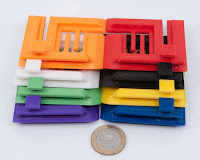
Ziggurat was designed by Eitan Cher and Bram Cohen and a quick squizz at the pieces will have you convinced that this is an n-ary puzzle… and you’d be right – but this n-ary puzzle is special: almost every other n-ary puzzle know to man relies on some form of cage or frame for the pieces to interact around… Ziggurat dispenses with the frame!

All of the interaction-enforcement is handled by the rather cleverly designed pieces themselves… and the really mind-blowing bit is that it’s all done with a single pair of handed piece designs – the engineering is very clever!

Eitan ships the puzzles with a stack of 6 pieces already threaded and mounted on a stand so that it displays rather neatly… and there are another two pieces shipped separately… so you have to play with the puzzle to add those last two pieces… and that’s going to involve learning how the pieces interact and how you introduce new pieces to the stack.

I won’t tell you how long it took me to work out how to remove the stack from the stand, because that would just be embarrassing…<quite a while!>

When I did get the stack free it was pretty clear where you needed to start, and having made a few moves you can start to see how the pieces interact – I find it helps if you keep a mental image of the direction of the outermost piece you’re currently moving, that way if you find yourself unexpected coming back the other way, you can recognise it early on and not just end up right back at the beginning. (Yup, got that t-shirt!)

Soon enough you find the rhythm of this n-ary delight and you can work your way around at will…

Of course you really do need to add those two additional pieces and close it all back up again… and even when you’ve done that, you’re still not really done… you see those pieces can also be assembled the other way around – so instead of starting with, say, a left-handed piece, you could start with a right-handed piece… and in theory all the moves are simply mirrored… unless of course your brain is now hard-wired in a particular handed-ness – and in that case you’re going to find it a little trickier…(Yup, got that t-shirt, too!)

It really is a clever design that strips the idea right back to the barest of bones and leaves just be the best bits to be played with.