Thursday, 7 June 2018

A couple of new cameras


Ages ago I spotted a picture of a Kumiki-style camera on Bernhard Schweitzer’s site which I subsequently discovered had been designed by William Waite and made by Pelikan. The Camera Conundrum had received an Honourable Mention in the IPP23 Puzzle Design Competition – so I set about trying to find one…

Recently the good folks at the New Pelikan Workshop recreated this old classic and it was briefly available for sale once more – sadly I missed that opportunity and my search continued. But my dogged determination recently paid off when I found a copy of the original Camera Conundrum available for sale… I did not miss out this time! 

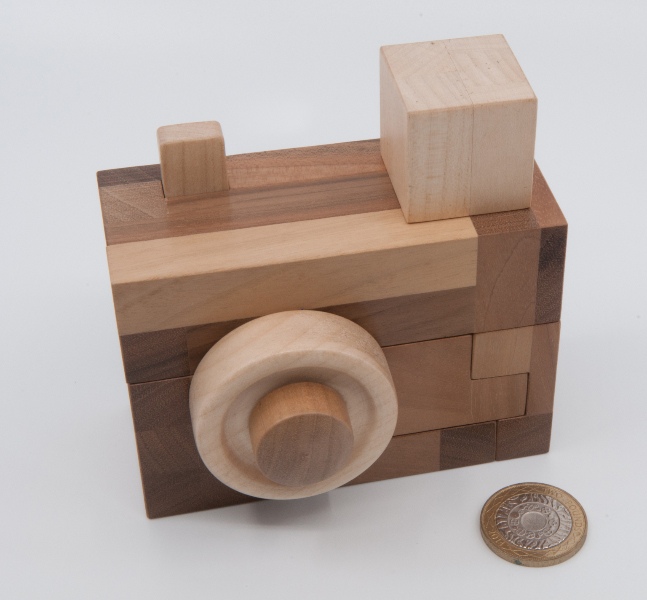
Resembling an old instamatic camera with a magicube flash on it [remember those?!] it’s a handsome little puzzle whose aim is disassembly and reassembly, finding a hidden compartment along the way… the coolest thing though is how various actions that you’d associate with those old cameras have been incorporated into the solution. 


At some point during the solution you’ll press the shutter release, manipulate the flash, focus the camera and wind on the film [actual film, remember that?!]. 


Somewhere along the way you’ll discover a drawer with a secret little hidey hole – plenty big enough for a standard ball bearing noise-maker, it turns out. 


Even with a pile of pieces, it’s not horribly complicated to work out where things need to go, and there’s a reasonably logical progression to building up your little camera… you have to love the way William’s made so many of the moves resemble things you’d actually do with these cameras.

The second camera comes from Hideaki Kawashima – one of the indecently talented gentlemen of the Karakuri Group. Back in 2014 he produced a fiendishly difficult Twin Lens Reflex Camera whose second compartment had me baffled, and he’s done it again with his Spring Camera. 


This one resembles an old vintage Voigtlander from around the 1930’s. Once again the detailing on the camera is stunning – you get the impression that lots of the detailing is there purely to make it look the part, but you won’t shake the feeling that some of those little thingies are going to be helpful in opening up this box…


…and so it is – find the right things to do and the front panel opens and the lens unit pops out – all very theatrical… you’ll find yourself closing it up and popping it open over and over again – it’s quite addictive. 


Get that far and you have a wonderfully functional little object… but still no idea of how to open the box… that takes a few more moves and some imagination… applied liberally and you’ll find you way into the little treasure compartment.


An absolutely stunning piece from a young man who is clearly passionate about his photography as well as his woodwork – the photos he puts up on his Instagram feed are fantastic – occasionally there’s even a puzzle pic or two on there…


Here’s hoping there’ll be even more little wooden cameras in future…

Saturday, 2 June 2018

Berrocal Mini Maria


Alternate title: Discovering a new rabbit hole…

I've been collecting puzzles for several years now and up until a couple of weeks ago I had managed to resist buying any Berrocals... frankly, it wasn't that hard - they're expensive and only seem to come up in art auctions where the prices can be eye-watering for a puzzler of limited means.  

Then things changed... no I didn't suddenly come into a large volume of cash; a couple of weeks ago Gill and I were fortunate to visit the Berrocal Foundation in Villanueva de Algaidas. 

We spent several hours listening to Carlos and Beltran talk about their dad’s work while wandering around the recreated workshop and studio – and it’s probably fair to say that we fell under their spell a little bit – in a good way. By the end of the tour Gill and I had decided that we should continue our tradition of bringing back a new piece of art from our holidays – and a mini Berrocal would class as art… we duly selected Mini Maria as the one most likely to fit in with the other stuff in the lounge and maxed out the credit card. (I hadn’t realised my friendly travel agent had just billed all our holidays for the rest of the year to the card on the same day!)

We headed back to the UK with Carlos promising to send Maria along behind us, and last Thursday I got home to find a large TNT box on the front porch waiting patiently for me. The packaging surprised me as most of the recent Mini multiples I’ve seen on art auction sites have come packaged in what I’d describe as an archive file box…and that’s what I’d expected – this one came in the full-blown original award-winning packaging.
 
Open the first box that’s nicely branded with the Berrocal multiples logo and a subtle Mini Maria emblem in the bottom corner and you’re faced with some nicely printed Mini Maria tissue paper (picture an A2 sheet with coloured pictures of the bits and a completed Mini Maria and you won’t go too far wrong!) cushioning the polystyrene innards – themselves styled after the completed Mini Maria… only a lot bigger!

Open the polystyrene casing and you find Mini Maria nestling in a moulded black plastic stand – complete with a little display plinth to use while you continue unpacking…lift that stand and beneath it you’ll find the instruction / background booklet that will help you take her apart (and reassemble her) while you read about her creation. Under the book there’s a moulded tray for laying out all of the parts neatly while she’s disassembled… a rather lovely surprise for someone who was literally expecting a carboard box!
 
Inside there are a couple of display stands -  a flat rectangle and a raised circle – you can choose how best to display her, however changing from one to the other requires full disassembly… you’re encouraged to take her apart and play with her bits… brilliant!

It doesn’t take long for me to fiddle around and dismantle her – it’s a pretty fun process, with some brilliant engineering, a solid locking piece and more than a little smut thrown in for good measure. 
Reassembly is decidedly non-trivial!
I resorted to putting together sub-assemblies and then collecting them into something that vaguely resembled the lovely little statue I’d started with. 

Several times I encountered a dead end and needed to back up a few steps, in order to introduce the appropriate piece at a more appropriate time. 

Things get easier as the pile of random shaped bits gets smaller and Maria begins to take shape. 
It’s fun experimenting with these wonderfully organic shapes, coaxing them into something bigger and beautiful. 

At the end of the day we have a wonderful little piece of puzzle history sitting on the mantlepiece in the lounge… the first puzzle allowed beyond the walls of the cave… and I got the warm fuzzy feeling that comes from supporting the Foundation established to looks after the artist’s legacy. 

Monday, 28 May 2018

The Louvre

Brian Young’s latest sequential discovery puzzle rocks!


This write-up is a long time overdue… and in spite of that, Brian still has these beauties for sale on his website over here. There’s no reason not to indulge…


My copy arrived, personally delivered and gift-wrapped, when Brian and Sue visited us ahead of IPP37 in Paris… Gill had arranged to buy a copy for me as a birthday present from my sister, and no matter how hard I tried to convince Sue to let me have it, she refused and insisted on handing it over to Gill – in fairness she knew that I wouldn’t be able to stop myself from unwrapping it and playing with it a month ahead of my birthday… but once it was safely in Gill’s hands, I had no option but to wait…


I got spoilt absolutely rotten for my birthday, and The Louvre was one of those things I kept revisiting, trying to make a little more progress on… and it ended up taking me quite a long time to get all the way through the path of discovery.


Brian’s introduction to the puzzle challenges you to find a French flag, a flagpole and the Mona Lisa and then raise the flag at full mast… sounds simple? Don’t you believe it!


At the start of the solve, there’s not a lot that can be done… there are a few holes and a couple of shiny nail heads on the front of the detailed building. There seems to be a panel on the bottom, although it doesn’t seem particularly keen to do anything useful… Oh, and Brian tells you there aren’t any magnetic locks so there’s probably no reason for bashing this cute little building. 


It turns out there are three main locking mechanisms to defeat – getting past the first one took me absolute ages – it’s a wonderfully simple little mechanism that is thoroughly devilish to work out… or that’s my excuse anyway! 


From there, things get tricky, although having seen some of Brian’s other puzzles might help a bit… 


There are tools and “stuff” to discover along the way… until you finally have the whole puzzle opened up and all the little bits in front of you… and you’re still not done! 


Time to raise the flag and display the Mona Lisa… the latter might be simple, but the former aint! 


This puzzle rewards a thorough understanding of each step in your progression – or you’ll easily find yourself going backwards a little and then realising your theories on how you’d progressed all turned out to be wrong… yup! Got the t-shirt! 


Get the flag raised on the flagpole at full mast and you can rightly be proud of your achievements… 


Return it back to the starting position and you’ll know that you really understand things in there…

Brian’s really gone and crammed a whole lot of puzzling into this little gem – and IMHO it’s definitely worth the price of admission…


Thanks Oz, I love it!


Postscript: for the love of all that is sacred – do NOT be tempted to insert a finger inside to play with “the mechanism” – you will regret it for a very long time … Yes, I have one of those t-shirts as well!