 OK, so I got back from IPP32 in Washington DC a couple of
weeks ago and so far I’ve only blogged about the events and the people and mentioned
the odd puzzle here and there, but I haven’t really talked about any of them in
much detail... time to change that!
OK, so I got back from IPP32 in Washington DC a couple of
weeks ago and so far I’ve only blogged about the events and the people and mentioned
the odd puzzle here and there, but I haven’t really talked about any of them in
much detail... time to change that!
I’ve made absolutely no secret about the fact that I’m a huge
fan of Jane Kostick’s gorgeous wooden geometric assemblies,
and I was really happy to see a couple of new Kostick designs in this year’s Nob Yoshigahara
Puzzle Design Competition. One of them had made a sneaky appearance on Jane’s
new website a couple of months earlier so I’d been keeping an eye out for it
and when Nick Baxter published this year’s entries of the competition, there it was – the 3-Layer Tetraxis Array.
 The picture on Jane’s website was pretty spectacular and the combination
of the woods and the geometry gave it an almost two-dimensional look
– take a look at the top right hand picture. That caught my attention, then
when Nick’s picture went up, it had a totally different combination of woods
and it looked pretty incredible. The one entered in the competition had Holly
blocks at the corners, an internal frame of Wenge, an outer frame of Spalted Apple
and a layer of Burmese Rosewood in between those two. It was displayed in one
of John’s silicon bronze Tetraxis Star Cradles – itself a lovely little feat of
engineering – the Cradle shares the same construction weave as the other
bronze stars, but its arms are bowed giving it the silhouette of a wine goblet,
or a champagne flute, depending on how wide you spread the arms ... very clever
– and makes a fantastic stand for Jane’s woodwork!
The picture on Jane’s website was pretty spectacular and the combination
of the woods and the geometry gave it an almost two-dimensional look
– take a look at the top right hand picture. That caught my attention, then
when Nick’s picture went up, it had a totally different combination of woods
and it looked pretty incredible. The one entered in the competition had Holly
blocks at the corners, an internal frame of Wenge, an outer frame of Spalted Apple
and a layer of Burmese Rosewood in between those two. It was displayed in one
of John’s silicon bronze Tetraxis Star Cradles – itself a lovely little feat of
engineering – the Cradle shares the same construction weave as the other
bronze stars, but its arms are bowed giving it the silhouette of a wine goblet,
or a champagne flute, depending on how wide you spread the arms ... very clever
– and makes a fantastic stand for Jane’s woodwork!
I’d had a bit of a fiddle around with the puzzle during the
design competition, decided I really liked it and that I’d need to try and get
my grubby paws on a copy at some point,
and then tried to avoid it for the rest of the time so that I could
enjoy discovering it again ... hopefully...
 |
| Three layers separated |
...and by now, if you’ve read my bit about the N.Y.C. Puzzle Dinner, you’ll know that Jane sold me the competition entry for a jolly good price
after she’d convinced herself that it was still in good enough shape after
being man-handled by a bunch of puzzlers for five days – I’d already told her
it still looked perfect but she wanted to check first... it still looks in
perfect condition now as it sits on my desk, having been played with at the
dinner in N.Y.C., making it back to the UK and then having several visiting
puzzlers have a bash at it and being played with all day at our last MPP – Jane’s
work keeps its finish beautifully and takes a lot of playing, with plenty of grace.
 Right, so now that I’ve got it home I’ve managed to have a
decent play around with it... what’s it all about?
Right, so now that I’ve got it home I’ve managed to have a
decent play around with it... what’s it all about?
As the name says, it’s made up of three layers of sticks
kept in place by magnets. Each layer can be constructed on its own, or in
combination with any of the other two – each combination giving you a pretty
unique looking piece.
 The innermost layer provides a skeleton for the rest of the
construction (although each of the other layers is self-supporting in its own
right) and is made up to long triangular Wenge sticks that each affix
themselves magnetically to an internal rhombic dodecahedron. Once you’ve done
that you have a spikey central core that you can wrap the next layer around
rather easily. The second layer uses the mid-length Burmese Rosewood sticks to
lock onto the Holly blocks at each vertex – the geometry of this layer is
particularly cute and it can be seen pretty clearly in the pic on the left. It sort of looks like it should want to collapse in on itself, but the magnets
and the geometry do a pretty good job of making it quite stable. The final
layer is the Spalted Apple that wraps around the outside. These sticks can be
joined in either groups of three or four thanks to the layout of their magnets –
and the overall lattice has alternating joints of three and four sticks down
any path that you might care to trace.
The innermost layer provides a skeleton for the rest of the
construction (although each of the other layers is self-supporting in its own
right) and is made up to long triangular Wenge sticks that each affix
themselves magnetically to an internal rhombic dodecahedron. Once you’ve done
that you have a spikey central core that you can wrap the next layer around
rather easily. The second layer uses the mid-length Burmese Rosewood sticks to
lock onto the Holly blocks at each vertex – the geometry of this layer is
particularly cute and it can be seen pretty clearly in the pic on the left. It sort of looks like it should want to collapse in on itself, but the magnets
and the geometry do a pretty good job of making it quite stable. The final
layer is the Spalted Apple that wraps around the outside. These sticks can be
joined in either groups of three or four thanks to the layout of their magnets –
and the overall lattice has alternating joints of three and four sticks down
any path that you might care to trace. 
Each layer makes for a lovely looking piece – having all
three together makes for a stunning piece.
I enjoyed playing around with the construction – the middle layer
can be a bit disorientating to build on its own – and the simplest way to build
it is probably to build the first two layers and then remove the first one from
the exoskeleton. Something that also intrigued me was the discovery that if you
move the Spalted Apple sticks aside a bit at any of the four-piece-joints, you
uncover a perfectly rhombic dodecahedron-shaped hole that will fit one of the Holly
blocks perfectly – not sure why that sort of thing still surprises me – it probably
shouldn’t by now! Anyhow ... I got to playing around a little and started
playing "hide the Holly blocks", and got about half – way round before the
structure started letting go – remember that the Holly blocks are holding the
middle layer together, so when you remove the blocks, that layer starts sliding
apart as there’s nothing holding it together. You can get a pretty good feel
for what it would look like – and it totally changes the look of the thing.
When Jane and I were chatting about her puzzles in NYC, she mentioned that she
was playing around with adding some extra magnets, and if I remember correctly,
that might just enable you to place all the blocks inside the structure as I
described... and keep it stable.
 I was incredibly chuffed when Jane insisted that I take the Tetraxis Star Cradle as a gift because John thought they went to well together – they really do
go well together ... but I was seriously embarrassed when she went rooting
through the unopened box of spare puzzles submitted to the Design Competition
and fished out the Chamfered Cube from that set and handed it over as another
present - seriously gobsmacked!
I was incredibly chuffed when Jane insisted that I take the Tetraxis Star Cradle as a gift because John thought they went to well together – they really do
go well together ... but I was seriously embarrassed when she went rooting
through the unopened box of spare puzzles submitted to the Design Competition
and fished out the Chamfered Cube from that set and handed it over as another
present - seriously gobsmacked!
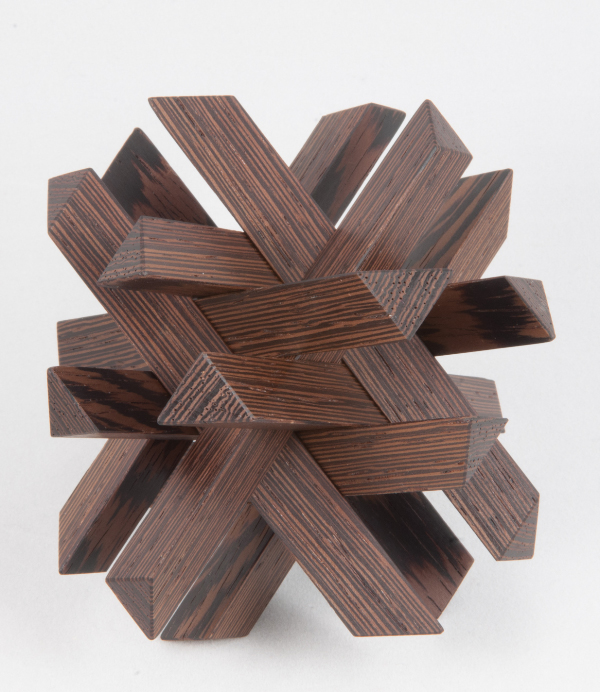
The Chamfered Cube is another multi-layered Kostick creation
that starts with a tiny Chamfered Cube (...there was a clue in the name!) in
the centre of four sets of three triangular sticks, with each set held together
magnetically with a rhombic dodecahedron at each end. [There’s probably a
picture below if you can’t wrap your mind around that – and if you can, move
along, I can’t teach you anything!] The triangular Purpleheart sticks each lie
flat against one of the chamfers, at an angle, leaving a tiny square pyramid of
empty space against each face of the little cube. The four sets effectively
form a pair of interlocking “X”s about this little Chamfered Cube in the
centre, and then twelve shorter Tigerwood sticks connect each of the adjacent
RD blocks, completing the structure ... which then looks like a Chamfered Cube
... in fact it looks just like the mini Chamfered Cube EXCEPT that the empty
space outside the mini cube has been reversed into negative space on the square
sides of the larger Chamfered Cube – neat little bit of symmetry there... :-)
 Fiddling around with this puzzle also shows that you can
build the exoskeleton using just the Tigerwood sticks and the corner blocks,
giving you quite a funky looking zig-zag cube with a lot of space in the
middle... and by the way, if you hadn’t already spotted it – take a look at the
triangular grain patterns on the external corners of all of the Ash blocks on
the corners of the cube ... that didn’t happen by accident.
Fiddling around with this puzzle also shows that you can
build the exoskeleton using just the Tigerwood sticks and the corner blocks,
giving you quite a funky looking zig-zag cube with a lot of space in the
middle... and by the way, if you hadn’t already spotted it – take a look at the
triangular grain patterns on the external corners of all of the Ash blocks on
the corners of the cube ... that didn’t happen by accident.
Thanks again Jane – that was incredibly kind of you ... and
I really love them!
_________________
If you’re interested in acquiring any of Jane’s pieces, please
drop her an email via her web-site – each piece is pretty much made up to order
so once you’ve settled on a design you can choose exactly the woods you’d
like and she’ll make it up to your specifications ... oh, and she’s a wonderful
person to deal with!
___________________
Neil’s written up an excellent post on all things Kostick
from this year’s Design Competition (and then some!) over here
– READ IT if you haven’t already...
___________________
By the way ... that little multi-coloured block just above the pen is made up of offcuts from the triangular stock during the manufacturing process - they 'just happen' to go together perfectly to make a rhombic dodecahedron. Neat!!
No comments:
Post a Comment